


Quality of Hat Embroidery: What Should You Look For?
By: CapBargain Posted on: Aug 6, 2026Embroidery quality varies significantly between vendors - and that variation only becomes obvious once you've received 500 hats with a logo that looks significantly different from the original.
Bad embroidery is expensive to fix, slow to replace, and damaging to the client relationships riding on your order. The good news is that a trained eye can catch most quality problems on a single sample before a bulk run ever starts. And that’s what CapBargain specializes in.
Presenting our quick and easy guide that covers exactly what to inspect, what questions to ask before placing an embroidery order, and what separates a professional embroidery partner like CapBargain from one that will cost you more than they save.
Stitch Density and Coverage
Stitch density basically means the number of stitches per square centimeter, which is the first thing to check on any embroidered hat sample.
If it’s too sparse, the fabric underneath shows through filled areas. This makes the logo look thin and unfinished. If it’s too dense, you get thread buildup that causes puckering, broken needles during production, and a stiff, raised effect that often distorts the cap's front panel. On a properly embroidered hat, filled areas should appear solid and even, with no visible fabric gaps and no bunching at the edges.
There is another important variable. Structured caps - ones with buckram-reinforced front panels and unstructured caps handle this density differently. A density setting that produces clean results on structured 6-panel hats may overwhelm soft dad hats. If you're ordering multiple cap styles with the same logo, verify the vendor is adjusting density settings per style - not applying a one-size-fits-all file.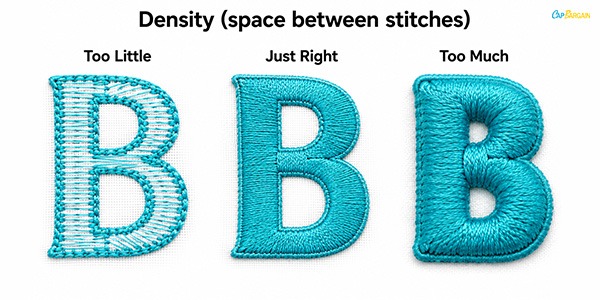
Thread Tension and Consistency
Thread tension is the pressure the embroidery machine applies to the thread as it stitches. If the tension is wrong, the results are immediately visible on the finished hat.
Signs of poor tension include:
- Loose thread loops on the surface of the design
- Fabric that puckers or ripples around the logo
- Visible thread breaks (tiny gaps where a stitch didn't complete)
- Thread tails that require a lot of trimming
High-quality embroidery lies flat against the cap fabric. The design surface should feel consistent when you run a finger across it, with no raised edges, no sunken areas, no spots where the thread pulled the fabric into a ridge.
Check out how we did it for our customers:
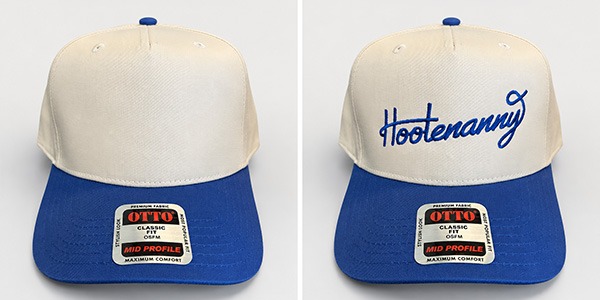
The back of the cap needs to have that finish too. Excessive thread buildup, loose bobbin stitches, or visible knots on the interior of the cap are signs of poor tension management throughout the production run. Clean embroidery has a tidy underside.
Digitizing Quality: The Foundation Most Buyers Don't See
Digitizing is the process of converting artwork including a logo, wordmark, or graphic into a stitch file that tells the embroidery machine exactly where to place each thread. It's the step that happens before the machine runs, and it's the single biggest determinant of embroidery quality that buyers can't directly observe. That’s why we have a team of professionals with expertise in digitizing all manner of artworks for embroidery.
Because we know poor digitizing shows up as jagged letter edges, lost fine detail, and misaligned outlines - something that happens to most embroiderers that deal with bulk orders. On caps specifically, digitizing failure looks different than on flat garments. A cap's curved front panel creates variable tension across the design surface with the stitches sitting tightest at the center seam and looser toward the sides. A digitizer who doesn't account for this produces designs that look distorted, oval where they should be circular, or uneven on a hat even if the same file looks fine on a t-shirt.
Our professional cap digitizing team sequences stitches from the center outward and from the bottom up, uses pull compensation settings adjusted for curved-surface tension, and limits design height to around 2.25 inches on a standard structured cap front panel. Stock digitizing files created for flat garments fail on hats, consistently.
If not us, then ask your vendor directly if they digitize in-house, or if they use pre-made stock files. Also check if they adjust settings specifically for cap embroidery. A vendor who can't answer these questions specifically is likely using generic files not built for headwear.
Backing and Stabilizer: What's Inspectable vs. What's a Process Question
These two terms are often confused, and for a buyer evaluating a finished hat sample, the distinction matters.
A stabilizer is material used during the embroidery process to hold the fabric in place on the machine. You won't see it after production as it's either torn away, cut away, or dissolved. A backing is what remains in the finished garment, visible on the interior of the cap beneath the embroidery. Both affect the quality of the finished product, but you can only inspect the backing directly.
For structured caps, the existing buckram front panel typically provides enough support for the embroidery process. For unstructured caps and dad hats, tear-away backing is the standard, and cut-away backing is appropriate for designs on soft or stretch panels that need extra long-term support. Three-ounce tear-away is the industry benchmark for structured cap embroidery.
On a finished sample, check the interior of the cap for the backing. It should be trim, flat, and not visible through the outer fabric. Backing that pokes through the cap fabric, feels rough against the forehead, or extends beyond the design footprint indicates poor process control.
Color Matching and Thread Quality
Embroidered color matching is different from print color matching. Thread colors are matched to Pantone references or thread manufacturer color systems (most commonly Madeira or Isacord), not to CMYK or RGB values. Though we also match the colors to CMYK or RGB values, we recommend matching to Pantone references as the two systems don't map perfectly. A reputed bulk hat embroidery source like CapBargain offers samples matched to your brand colors before production rather than working from a screen reference.
On a finished sample, hold the embroidery under natural light and compare it to your brand color standard. Minor variation is expected but significant drift like a navy that reads purple or a red that reads orange indicates either poor color matching or low-quality thread stock.
Thread type is just as important as thread quality. Polyester thread is the current industry standard for custom hats at wholesale volume. It's colorfast through repeated washing, UV-resistant, and consistent across production runs. Rayon thread produces a slightly shinier aesthetic but fades faster, is less resistant to moisture and UV exposure, and may perform inconsistently in high-volume runs. For most branded hats that will see regular outdoor and wash exposure, polyester is the right choice.
Edge Definition and Fine Detail
The hardest test of any embroidery vendor is small text and fine lines. These are where cheap digitizing and inconsistent machine calibration show up fastest.
Clean, high-quality embroidery has crisp, defined edges on every letter and design element. Individual letters should be clear even in small sizes. Fine lines like borders, outline elements, small graphic details should be consistent in width and not frayed or fuzzy at the edges. Embroidery experts in CapBargain’s decoration team never misses all these details, ensuring professional-grade results on embroidery without charging high like most other platforms.
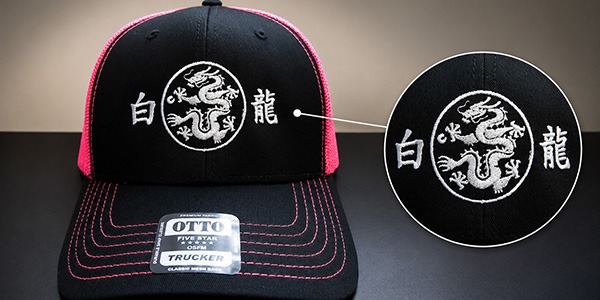
Examine a sample logo under close light - look at the corners of capital letters, the spacing between characters in small text, and the point where two colors meet within the design. If edges look rough or the letter spacing is uneven, that problem won't improve in production as it will replicate across every unit in the run.
Durability Check: Testing Before You Commit
A hat can look perfect fresh off the embroidery machine and still fail in regular use. Do a wash test on the sample you receive before placing a bulk order.
Machine-wash the sample in cold water on a gentle cycle. After one to three wash cycles, inspect the logo. The thread should show no fraying, colors should remain consistent with the unwashed version, and the design surface should lie flat with no new puckering. Puckering that appears or worsens after washing indicates insufficient stabilizer support or incorrect backing selection during production.
A vendor confident in their work will have no issue with you running a wash test. One who discourages it is telling you something.
Quick Embroidery Quality Checklist
Use this on any hat sample before approving a bulk run:
- Stitch density - Filled areas are solid with no visible fabric showing through. No thread buildup or heavy stiffness
- Thread tension - Design lies flat with no loops, puckering, or thread breaks. Back of cap is tidy
- Digitizing - Design holds its shape without distortion on the cap's curved surface. Edges are clean, not jagged
- Backing - Interior backing is trim and flat. Not visible through outer fabric. Doesn't contact the forehead roughly
- Color accuracy - Thread colors match your brand standard under natural light
- Thread type - Polyester thread confirmed for colorfast, wash-durable performance
- Edge definition - Letter edges and fine lines are crisp. Small text reads clearly at size
- Wash test - After one to three gentle machine washes, no fraying, no color shift, no new puckering
- Vendor process - Vendor digitizes in-house specifically for cap surfaces. Adjusts settings per cap style
Custom embroidered hats are a lasting brand investment. They get worn in public, photographed, and associated with your name every time. The quality standards above are the same ones we apply to every order at CapBargain. If you're comparing vendors or evaluating a sample right now, use this checklist as your benchmark, and reach out to our friendly team if you want to see what professional cap embroidery looks like on a sample before you commit.
Frequently Asked Questions
Q. What is the most common cause of poor hat embroidery?
Digitizing. Most embroidery quality problems including distorted logos, jagged edges, misaligned outlines on caps trace back to a stitch file that wasn't built for the curved surface of a hat. A file created for flat garments will underperform on structured cap fronts.
Q. How many stitches should a hat logo have?
A standard cap-front logo runs between 5,000 and 15,000 stitches depending on design complexity and size. Stitch count alone doesn't determine quality. Density, sequencing, and compensation settings matter more than the total number.
Q. What's the difference between tear-away and cut-away backing on a hat?
Tear-away backing is removed after embroidery and is standard for most structured caps. Cut-away backing stays in the finished garment and is used for unstructured or stretch-panel caps that need long-term support. The wrong backing type for your cap style affects how the logo holds up over time.
Q. Should I ask for a sample before ordering custom hats in bulk?
Always. A sample lets you inspect stitch quality, color accuracy, and digitizing results on the actual cap style before committing to volume. Any reputable embroidery vendor will provide one.