Tips for designing a Custom Hat for your Team
By: Melody D Posted on: Jul 7, 2022Custom hats are one of the most effective ways to outfit your team. It keeps your team members protected from the sun, gets more people to see your logo, and adds a professional edge to your business.
But how do you design the custom cap that is perfect for your company? Our design experts recommend looking for these four factors - colors, logo placement, fonts, and customization options. Let us take a look at each of them.
Logo Placement
Your logo can be placed on the Center Front, left or right front panels (for six-panel caps), left or right side panel, or the back arch of the cap. Most branded caps will combine one or more of these design locations based on requirements.
Front Panel
The logo of your company should ideally be placed on the front panel of the hat to make it easily visible. This is the most common area for cap decoration as it gives you a large sewing area to work with.
Ideal for: main logo, brand name, etc.

Back Panel
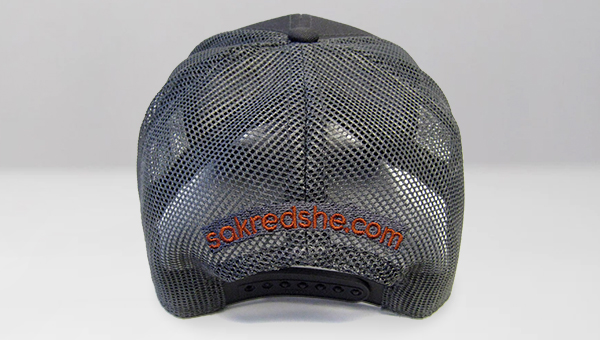
Things could get pretty cramped if you include your brand’s motto, tagline, or website address, on the front panel along with the main logo. We recommend moving such details on the arch of the cap in the back panel. For fitted caps, you can use the full center back instead of just the arch.
Ideal for: Tag line, Website address etc.

Left and right side panels
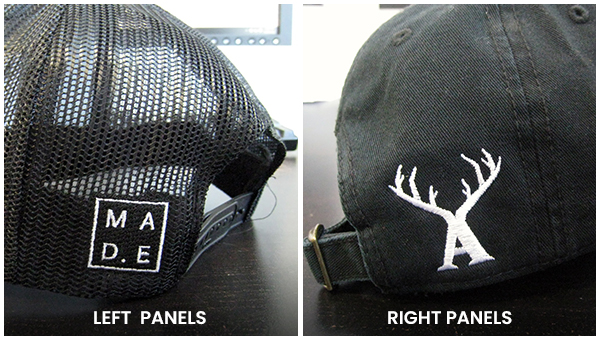
Side panels are usually smaller and have limited space for artwork. They work best with short taglines, establishment year, simplified logos, and other smaller design elements.
Ideal for: Smaller elements like abbreviations, initials, or motto.

Colors
The colors on your promo cap speak volumes about your brand. To properly communicate your brand's ideas, you have two sets of colors to keep in mind - the colors in your design and the one on the cap. Here is how you can find the best colors that work together.
Stand Out With Complementary colors
The simplest way to make them work together is by using dark designs on light colors caps and the other way around. Some of the most popular dark colors for caps are black, charcoal gray, gray, navy, and so on. To maximize the visibility of the logo on these caps, use logos with bright colors such as white, yellow, cream, sky blue, and so on.
And of course, design experts at CapBargain are here to help you out. Request a quote to get in touch and our team will find color combinations that make your logo pop.
Fonts
Fonts are just as important as Colors and logo placement and you can’t overlook them when creating custom hats for business. The right fonts will make your cap stand out from the crowd and help create the brand image you want.
Choose Sans Serif Over Serif Fonts
Serif fonts have little decorative attachments at their ends (think Times New Roman) and they give off traditional, formal vibes. However, when used to embroider small text, these fonts tend to become ineligible. This is why our experts recommend sticking to the cleaner and sleeker look of sans serif fonts in most cases.

Use Big Block Fonts
Embroidery on hats works great with block letters. Calligraphy fonts where the thickness of the stroke gets very narrow towards the edges will not be discernible when embroidered in small sizes. Such text will have to be simplified or enlarged to make them visible and easier to stitch.

Customization Options
So far, we looked into finding the best color for your cap and design, choosing a great font, and determining the perfect location for your design. Now we need to customize a hat with the design. When it comes to customizing a hat, you can choose from a few different options. The most popular among them are flat embroidery, 3d embroidery, and Heat Transfer.
Flat embroidery - The Classic
Flat embroidery is one of the most popular techniques for decorating wholesale caps. In this method, the design is created by stitching the decorative threads directly onto the cap. This results in an upscale look and feel. However, there are some limitations to embroidery as it cannot be used for designs with intricate details, small texts, and color gradients.
3D embroidery - for an elevated look
In 3D embroidery (aka puff or foam embroidery) a foam is placed on the fabric. When the stitches are made over the puffs, the design will protrude from the surface creating a three-dimensional effect. This method is great for simple logos and monograms.
Capture fine details with Digital Heat transfer
Digital Heat transfer is a decoration method that uses heat and pressure to apply a pre-printed onto the cap. This method is perfect for full-color designs with lots of complex/small details that are hard to do with embroidery.
To learn more about the differences between embroidery and heat transfer, check out our post on popular decoration methods.
At CapBargain, you can choose from any of these depending on the type of design and the cap you want to use. Our expert designers will take care of all these factors and more to make sure that your promo cap stands out and gives you the best results. Request a quote to get started now or create your own cap design with our Custom Cap Creator.
